Using the New Swift Testing API to Test our Domain Layer
Part 2 of Re-Building Ovo Timer using SwiftUI and Xcode 16
Author: Lucas van Dongen
⚠️ This article is aimed at Swift developers who have at least some experience building applications. I expect you to understand the basics of Swift, SwiftUI, Xcode, Testing in Xcode, Previews in SwiftUI, and Swift Packages. If you're new to any of these topics, but interested in them, take a look at the links first.
A Short Recap
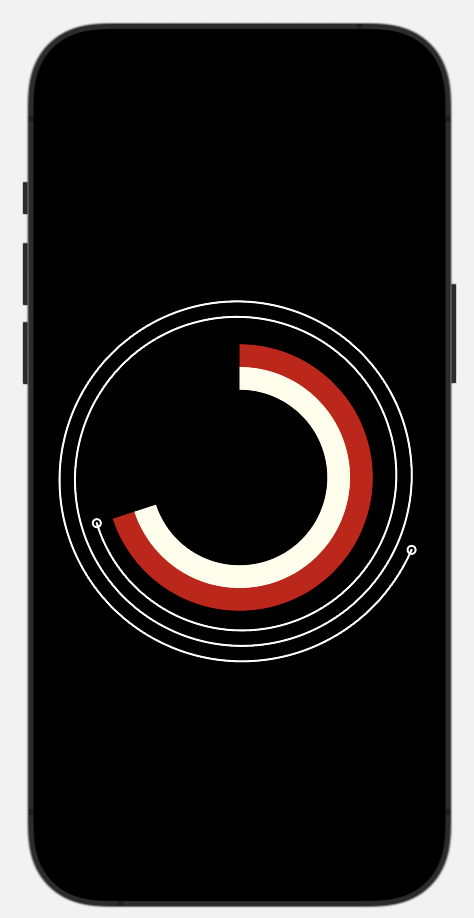
In Part 1 we discovered the new LinePlot Chart from Swift Charts and introduced the application we are going to overhaul using Xcode 16 and SwiftUI. We saw how easy it is to draw the spiral and the inner circle that form the heart of the UI of Ovo Timer:
Now, we will focus on the most fundamental part of any app: the Model layer. Since this is an offline application, you might think this is a lot simpler than usual. But we're dealing with a lot of different and unique ways to change the state not seen in most applications.
In Part 2 we are going to see how to build the Model layer using the new Swift Testing API in Xcode 16 that debuted on WWDC24 (see some advanced use cases), using the Test Driven Development (TDD) methodology .
🔎 Follow the progress of this project on GitHub and this blog. Subscribe to my RSS feed or follow me on Twitter to stay up-to-date on new posts.
This install covers the following topics:
- Test Driven Development of the Model layer
- The new Swift Testing API
It also touches on some of the benefits of working in local Packages.
💡 I would recommend early and mid-career developers to read "Mastering the Model Layer: Iron-Clad State Management in Model-Driven Apps" first, because it addresses a lot of concepts that I touch in this article as well.
⏰ If you are only interested in what Swift Testing looks like, you can skip right to the code here.
Modelling Our Data Layer
I always advise you to document first both what your State Models look like and how your State changes happen using a UML tool like draw.io, a whiteboard with colleagues or just pen and paper if you're working alone. Planning up front and planning together will help you think about all edge cases that might happen, makes your code more readable because it's mapping this diagram with more natural words and it's a good checklist to check if your implementation is complete and correct.
For Ovo Timer the state diagram looks like this:
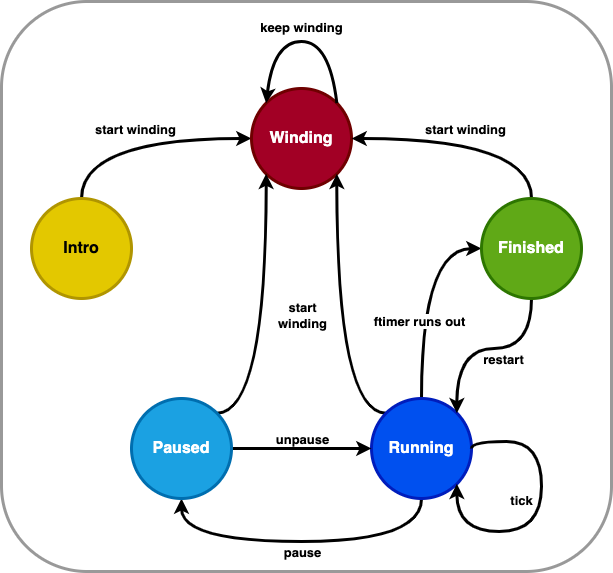
It's clear that it's always possible to wind the timer, because this is the core UI mechanic of the app. There are three different reasons to change into or update Running state. It's equally important to define the reasons for a state change as to think about the states themselves. I will explain more about this later.
Possible State Changes
Let's take a closer look at our possible states, the reasons you might end up in each one, how they are reflected in the UI, and what data is associated with these states:
| State | Reason | UI | Data |
|---|---|---|---|
| Intro | The app hasn't been used at all, or not for a long time | The user sees instructions | none |
| Finished | The app finished a timer recently at app boot, or just finished one during this session | We can restart this time | Previous time |
| Winding | The user started or keeps winding up the timer to select a new time | The spiral is drawn and moves with the user's finger | Currently selected time |
| Running | The timer is set and running | The timer counts down | Remaining time, Selected Time |
| Paused | The user halted a running timer using the pause button | The paused timer, ready to unpause | Remaining time, Selected Time |
One extra use case we immediately observe is that when the timer is in Running mode, every second the Remaining time gets decreased. And when we are winding, the Selected time changes at every click of our touch gesture.
I ended up with the following State enum:
public enum State: Equatable {
    case intro
    case winding(selectedTime: Ticks)
    case running(
        remainingTime: Ticks,
        selectedTime: Ticks
    )
    case paused(
        remainingTime: Ticks,
        selectedTime: Ticks
    )
    case finished(woundTime: Ticks)
}
State Initialization
Ovo Timer was designed to be completely resilient against any kind of termination of the app. A timer is often critical for the user, so we must always alert the user at exactly the right time. The original implementation used two techniques to give the user a continuous experience, even if the app might be terminated in between:
- Scheduling a local notification that will sound the alarm at the expected time, even when the app has been terminated for any reason
- Being able to restore any state the app was in before termination
If you restart your phone, the alarm still sounds at the right time, but also you will still see it counting down in the UI if you open the app again if the timer was not yet finished.
To do this, we have to store the state to disk when it (significantly) changes, and load it again when the app launches. We have three values stored, that together determine the initial state of Ovo Timer:
- Store Date: whenever we store a State, we want to know how long ago so we can determine it went stale
- Wound Time: to be able to repeat the time after finishing, we always need to know what the initially wound time is, in relevant cases
- End Date: the projected end date when a timer is running, so we can deduce if the timer is already finished and if not, how much time remains
- Paused At: if the timer happened to be paused before termination, we need to know how much time was reset
Check out how these values together determine in what state the application boots:
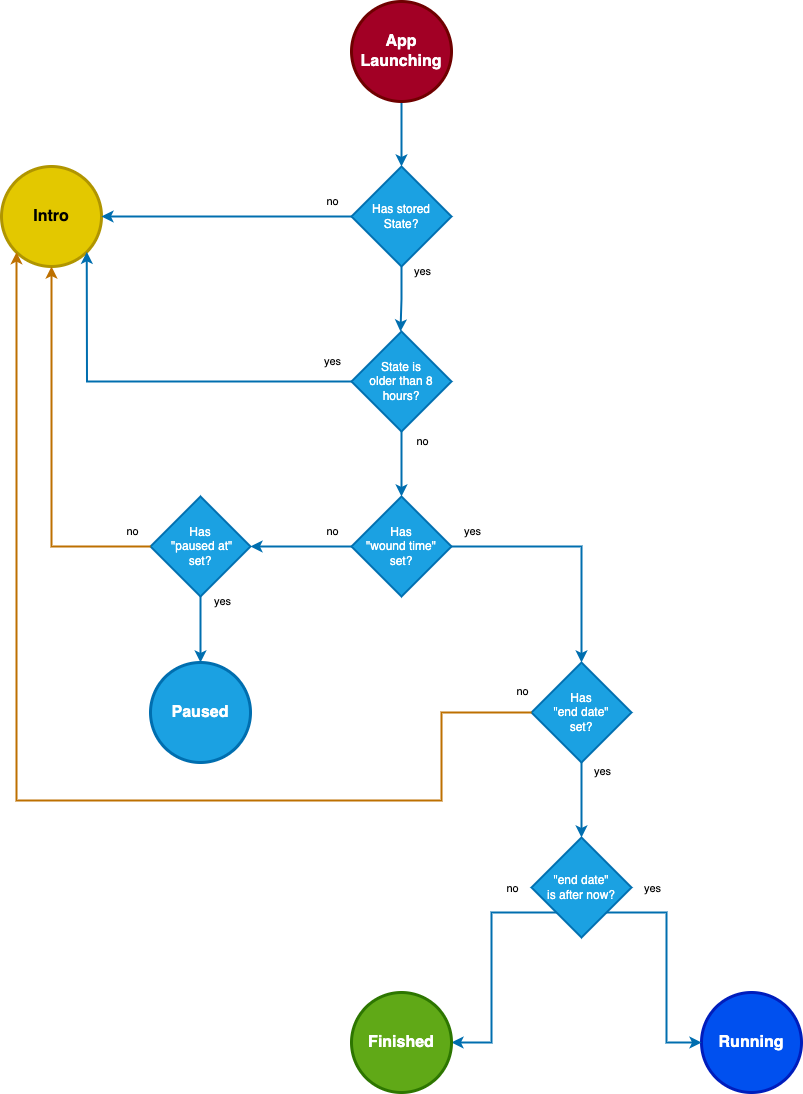
- No previously stored state: because it's a brand new or still unused install, we always show the Intro, so the user understands how to use the app
- Stored state is stale: we show the Intro again. The user might have forgotten the core UX mechanic.
- End date exists: we assume it was a running timer
- End date before now: the timer already ended and we show the Finished state
- End date in the future: we are showing a running timer
- Paused at exists: we restore the timer to Paused state
Any combination of values that has not been recognized by now, is considered an illegal state and also defaults to Intro, but we do check for scheduled notifications in the future, just to be sure. This last step is out of the scope for the current article, but we will address this in the Part about notifications.
Building Our Tests First
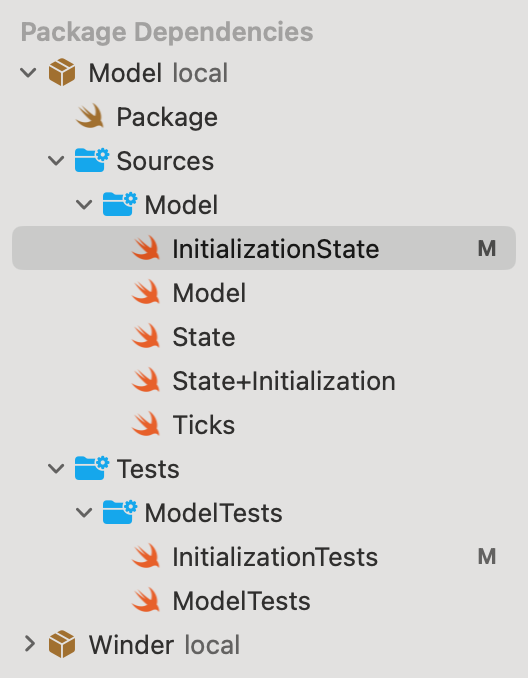
We add another package called Model to our project. We are going to write our tests inside of this package instead of the main project.
I won't go too deep into the theory I already explained in my article about State again, but the reasons to create so many packages, even for "trivial" apps like Ovo Timer are:
- Packages force you (and any developer that follows in your footsteps) to separate concepts
- You get
private,publicandinternal(the default when we add nothing).internalis really great for exposing certain parts of your Package to tests inside of it and other parts of the Package, but keeping them away from Packages or Applications consuming this Package. Consider itpackageprivate, if that makes sense? - They run their tests and/or Previews much faster, because we don't have to build the whole app. And sometimes we can use the "macOS" Run Destinations, which execute tests even faster.
Let’s now focus on the tests for the state changes:
1. Define What Your Tests Are Going To Be
A lot of people new to TDD make the mistake of writing every test immediately against the API and the results we think we are going to use. This is wrong. Just write down the tests of the use- and edge cases you defined earlier (for example diagramming) and make them fail immediately.
This is what I started with for the InitializationTests, that check that we build the State correctly from what we saved on disk:
import Testing

@testable import Model

@Suite
struct InitializationTests {
    @Test("Should have .intro state when loading empty state")
    func noSavedState() async throws {
        #expect(false)
    }

    @Test("Should have .intro state when loading inconsistent state")
    func inconsistentState() async throws {
        #expect(false)
    }

    @Test("Should have .running when the end date is after now")
    func runningState() async throws {
        #expect(false)
    }

    @Test("Should have .finished when the end date is before now but not older than x days")
    func finishedState() async throws {
        #expect(false)
    }

    @Test("Should have .intro when the end date is older than x days")
    func expiredState() async throws {
        #expect(false)
    }

    @Test("Should have .paused when the pausedTime is set")
    func pausedState() async throws {
        #expect(false)
    }
}
If I would have added the bodies of the tests immediately, I would need to refactor every test as I would progress through the test cases and started to realized I might need a change here and there in my API.
I might end up adding or removing a few tests, but defining up front about what all of the business rules are forces you to think about the complete picture. And it guides you to write your code in a way that allows any reader, including non-programmers, to understand the business rules you're trying to achieve.
You can already spot some differences compared to the old XCTest suite API:
- We can put our test functions anywhere we want, even at the root of the file
- Our test functions don't need the
testprefix anymore, reducing clutter. - The required
@Testmacro allows us to set a lot of things, like the descriptions of the tests, tags, andargumentslists - The optional
@Suitemacro to group tests
2. Start Implementing Your Tests One-By-One
The best order to write your tests is to start with the tests for functionality that you are absolutely sure of. In the case of Ovo, I am absolutely dead sure that at every tick the time decreases with one second, and that once the last second ticked away, the timer is finished. This happens in ModelTests.
They are also a great example of what Swift Testing tests look like beyond tutorial code:
@Test(
    "Tick should decrement the amount of seconds left with 1",
    .tags(.running),
    arguments: [
        TickTestArguments(
            .running(remainingTime: 100, selectedTime: 100),
            ticks: 1,
            expectedState: .running(remainingTime: 99, selectedTime: 100)
        ),
        TickTestArguments(
            .running(remainingTime: 100, selectedTime: 100),
            ticks: 50,
            expectedState: .running(remainingTime: 50, selectedTime: 100)
        ),
        TickTestArguments(
            .intro,
            ticks: 1,
            expectedState: .intro
        ),
        TickTestArguments(.paused(remainingTime: 123, selectedTime: 300), ticks: 1, .paused(remainingTime: 123, selectedTime: 300)),
        TickTestArguments(.intro, ticks: 1, .intro),
        TickTestArguments(.winding(selectedTime: 1), ticks: 1, .winding(selectedTime: 1)),
        TickTestArguments(.finished(woundTime: 300), ticks: 1, .finished(woundTime: 300))
    ]
)
func tick(arguments: TickTestArguments) async throws {
    let model = Model(state: arguments.initialState)

    for _ in 1...arguments.ticks {
        model.tick()
    }

    test(
        expectedState: arguments.expectedState,
        against: model
    )
}

@Test(
    "When the last second ticks away, we should get the .finished state",
    .tags(.finishing)
)
func finished() async throws {
    let model = Model(state: .running(remainingTime: 1, selectedTime: 100))
    model.tick()

    test(
        expectedState: .finished(woundTime: 100),
        against: model
    )
}

private func test(
    expectedState: State,
    against model: Model,
    fileID: String = #fileID,
    filePath: String = #filePath,
    line: Int = #line,
    column: Int = #column
) {
    let sourceLocation = SourceLocation(
        fileID: fileID,
        filePath: filePath,
        line: line,
        column: column
    )

    test(
        expectedState: expectedState,
        against: model,
        sourceLocation: sourceLocation
    )
}

private func test(
    expectedState: State,
    against model: Model,
    sourceLocation: SourceLocation
) {
    if case expectedState = model.state {
        #expect(true, sourceLocation: sourceLocation)
    } else {
        #expect(
            Bool(false),
            "Got \(model.state), expected \(expectedState)",
            sourceLocation: sourceLocation
        )
    }
}
A bunch of interesting things are happening here:
- Argument sets need to match the arguments of the functions we test against. You can also just send tuples to match multiple arguments in the function, something I only realized when I wrote my last test.
- If you add a lot of stuff to the
@Testdeclaration, like a description, tags and arguments. It often gets bigger than the test itself. - My test functions themselves look cleaner than before as a result of that, while doing the same.
- It took me some time to figure it out as it was a bit underdocumented at the moment, but with
SourceLocationand the existing tags like#linethat XCTestCase already supported you can push the test failure to the calling test of the helper function. It's a bit more wieldy than I would like but reportedly there's already a macro coming up. - Writing
#expect(false)would generate a warning, that would only go away using#expect(Bool(false)). I couldn't figure out yet how to simply fail a test.
The Resulting Model Code
I ended up with an implementation the Model like this:
public protocol ModelImplementing {
    var state: State { get }
}

@Observable
public class Model {
    private(set) public var state: State

    init(state: State) {
        self.state = state
    }

    func wind(to ticks: Ticks) {
        guard
            ticks >= 0
        else {
            return
        }

        state = .winding(selectedTime: ticks)
    }

    func start() {
        switch state {
        case let .winding(timeToCount):
            state = .running(
                remainingTime: timeToCount,
                selectedTime: timeToCount
            )
        case .intro, .running, .paused, .finished:
             break
        }
    }

    func restart() {
        switch state {
        case let .finished(woundTime):
            state = .running(remainingTime: woundTime, selectedTime: woundTime)
        case .intro, .paused, .running, .winding:
            break
        }
    }

    func pause() {
        switch state {
        case let .running(remainingTime, selectedTime):
            state = .paused(remainingTime: remainingTime, selectedTime: selectedTime)
        case .intro, .winding, .paused, .finished:
            break
        }
    }

    func unpause() {
        switch state {
        case let .paused(remainingTime, selectedTime):
            state = .running(remainingTime: remainingTime, selectedTime: selectedTime)
        case .intro, .winding, .running, .finished:
            break
        }
    }

    func tick() {
        switch state {
        case let .running(previousRemainingTime, selectedTime):
            let remainingTime = previousRemainingTime - 1
            state = switch remainingTime == 0 {
                case true: .finished(woundTime: selectedTime)
                case false: .running(remainingTime: remainingTime, selectedTime: selectedTime)
            }
        case .intro, .winding, .paused, .finished:
            break
        }
    }
}
The Model code looks fairly simple to the point of being borderline trivial, but it all serves a purpose: you cannot ever end up in an invalid State or make an unexpected transition between States that are valid themselves. But it also serves another function: we now know the reason something changes.
After all, what is really the difference between the start(), restart() and unpause() functions? They all end up putting your State to .counting. But they can only happen from certain states, and they only happen from certain UI states and elements:
- The pause/unpause widgets only need to know about
pause()andunpause() - Only the
.finishedstate and UI gets to userestart() wind(to:)andstart()can only be called by theWindertickis only called from theTimerimplementation
We can hide them behind protocols, preventing every part of the UI seeing every possible mutation of the Model.
The Benefits of Writing The Model Layer Before the UI
While I cheated a bit by testing if I could draw my Spiral first, I did not fall into the trap of building the UI and Model in tandem. It's a really bad habit to build all bits and pieces in tandem, because you will typically introduce these anti-patterns:
- Strong coupling between Model and UI, or worse: no separation at all
- Continuous booting and using the application to test any change in UI or Model, wasting a lot of time and compounding into the future
- Either repeating every use case manually on every change, or not covering possible regression in certain edge cases (it's usually the latter)
- We can completely skip the waiting part for timers to run out, since we can call
tick()as fast as we want
By building your Model first, using unit tests, and then your UI separately using Previews, you are both iterating in the fastest and the completest way possible over your features. Because you also check all of your edge cases every time, and check them much faster than even your application even boots:
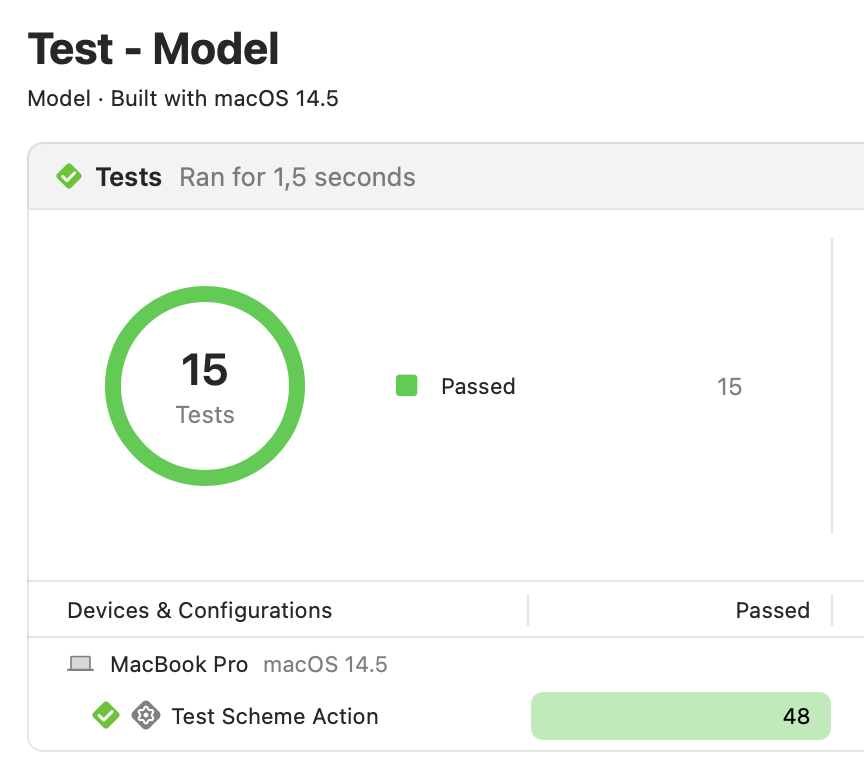
On top of that, all of your tests and Previews (which can be turned into Snapshot Tests) can help you prevent problems in the future, because future developers and the CI will execute the same tests automatically. While the future value of every manual test you perform is gone the moment you change anything in your code.
The True Goal Behind This Approach
The main driver is immediate productivity, not best practices or theoretical wins over longer periods of time. So while I test my Model, some of my other Dependencies and individual UI widgets (including their ViewModels) using Previews, the only real goal is to ship my application better and faster.
The Model and State in this project are ideal to build using a TDD approach, because there are many different possible states and reasons to change. I would say it's rather pure laziness that drives me to write tests, rather than a higher, noble goal. Also my memory isn't that great, so I'm not that good remembering all permutations and edge cases I initially recognized over a longer time. So this is also a way I document my decisions.
I really don't want to boot up my app, unless I know I absolutely have a fair chance that everything I wrote already works, and I'm only checking how all of the well-tested pieces work together. The launch/debug/fix loop is mentally exhausting, and on larger applications the build times exceed the threshold where I can still remain on my full 10x focus.
My Conclusions Using Swift Testing
My personal experience with Swift Testing has been nothing but stellar. It really feels like they have been extensively dogfooding this package before even releasing the Xcode 16 beta. It feels a lot more complete and stable than most other new features on a final release of Xcode.
- The
@Testand@Suitemacros are a really nice abstraction that cleans up the UI - I like
arguments, but it's not really easy to make them share certain constants. I ended up dumping them privately in the test file tagsare great and work exactly like expected- Performance was great for me, but I saw an engineer at Lyft running into issues on larger sets of tests
- I would like to see something like a
#fail(reason:)macro to make "you shouldn't be on this line of code" failures more easy to read - Helper functions that show errors on the right line (of the calling function) got a bit more complex to build, but that should be fixed in an upcoming iteration
Xcode 16 itself definitely has been a mixed bag so far for me. It can definitely crash on project changes, and sometimes there's a very strong flicker in the UI. However this seems to be some kind of general SwiftUI issue that also affects widgets on the iOS 18 beta for example.
The Next Step in Rebuilding Ovo Timer
We already put a few major steps towards the SwiftUI version of Ovo Timer, but one of the things I never really got down to is adding a Widget to the control center and using the Dynamic Island. Of course you want to see quickly how much time is left on your timer, without having to go back to the timer app while reading the recipe website for your delicious Thai Curry.
In the next install of this series, I'll take a deeper look at ControlWidgetButton and do an Intents-driven approach on adding features to my application.