Drawing a Custom Spiral using Swift Charts new LinePlot Chart
Part 1 of Re-Building Ovo Timer using SwiftUI and Xcode 16
Author: Lucas van DongenI've updated the article after cleaning up the project a little bit. I now pushed it to GitHub so you can check out the whole project in action. I will keep pushing new versions there as the project progresses.

A Short Introduction on the Original Ovo Timer
Ovo Timer was one of the first apps I wrote (I started writing it in 2013) and it was an official clone of the Android version of Ovo Timer. At that time I was looking to pad out my portfolio a bit and I thought the app was looking really cool, with some special interactions using the winding gesture.
//
//  Timer.h
//  OvoTest
//
//  Created by Lucas van Dongen on 24-08-13.
//  Copyright (c) 2013 Lucas van Dongen. All rights reserved.
//

typedef enum {
    TimerIsRunning,
    TimerIsBeingPaused,
    TimerIsBeingStopped,
    TimerIsStopped,
    TimerIsPaused
} TimerStatus;

@interface Timer : NSObject
It was well before Swift was introduced, let alone usable, so I built the whole application in Objective-C and UIKit. Back then UIKit was already a very mature and allowed for all kinds of custom drawing. I picked UIBezierPath to draw the spiral and the circles for the countdown, creating them from quarter circle arches as Beziér paths could not draw true circles. I created a custom gesture recognizer for the rotation gesture. I added a slight click going through the values while winding using the Haptics Engine.
The result looked and felt amazing!
At a given point the app was done, bug free and I stopped paying attention to it. I never ported it to SwiftUI because of it still had too many limitations. And ultimately, I stopped paying my Developer account as it was the only published app left on my account, so it is out of the App Store for about a year now.
Still, I thought about it from time to time.
The Journey of SwiftUI
I have been using SwiftUI from the beginning, but there were always a few things you couldn't do with it, like Ovo Timers's custom drawn graphics, unless you were really desperate to do it in SwiftUI. Until WWDC 24 that is. I really have to admit that SwiftUI has grown up, and supports everything out of the box that is enough to do 99% of everything UIKit does. For example the new ScrollPosition API gives you the same fine-grained control we used to enjoy in UIKit.
When I saw the new LinePlot capabilities demoed in a short video about new Swift Charts capabilities, I immediately recognized that it would be a perfect fit to draw the spiral of Ovo Timer.
I finall felt inspired to port Ovo Timer to SwiftUI!
I planned out the following steps:
- Getting the Spiral Winder and Circle Countdown features to work visually
- Get the Winding Gesture and Haptic Feedback working ✋
- Write the Core Logic, Test Driven
- Add Notifications 🔔
- Create a Widget
- Add the Settings Screen ⚙️
- Ship It (again!) 🛳️
I want to try a heavily modularize approach using packages, of course use the new Swift Testing suite and make everything work with snapshots through Previews.
Trying Out the new LinePlot Chart
I hadn't used any of the Swift Charts before, so it took a bit of figuring out how to use it, on top of the fact that there wasn't any information beside's Apple's on LinePlot.
But fairly quickly I manage to hash out a basic spiral that could be changed interactively and I actually spent most of my time on the line caps. Drawing the spiral turned out being dead easy, with a bit of help from ChatGPT for the formula.
Not a bad start!
So How Did I Implement This?
The source code so far is not that complicated, let's take a look at it step-by-step:
import Charts
import SwiftUI
// Read the comments in `LinePlot` below to understand why I did this
fileprivate let spiralCalculator = SpiralCalculator()
public struct Winder: View {
public let viewModel: WinderViewModelImplementing
private let width: CGFloat
public init(
width: CGFloat,
viewModel: WinderViewModelImplementing
) {
self.width = width
self.viewModel = viewModel
}
public var body: some View {
Chart(viewModel.points) {
LinePlot(
x: "x",
y: "y",
t: "t",
domain: viewModel.beginAngle...viewModel.endAngle
) { t in
// There's a special issue here that I don't know how to deal with yet
// This function (probably for good reasons) is synced to the MainActor
// So it's really hard to call anything outside of it if you want to share the mathematical function!
// That doesn't stop it from calling this function on the Main thread anyway 🤷♂️
spiralCalculator.spiral(t: t)
}
PointMark(
x: .value("Wing Length", $0.x),
y: .value("Wing Width", $0.y)
).symbol {
Circle()
.fill(.clear)
.stroke(
.white,
lineWidth: 2
)
.frame(
width: 8,
height: 8
)
}
}
.chartXScale(domain: -8...8)
.chartYScale(domain: -8...8)
.chartXAxis(.hidden)
.chartYAxis(.hidden)
.aspectRatio(
1,
contentMode: .fit
)
.foregroundColor(.white)
}
}The LinePlot Itself
The LinePlot takes four arguments:
- x: A string value that indicates what the X-axis is called on the Chart
- y: The same, but then for the Y-axis
- t: Finally the label for
t, I think it usually stands fortime - domain: A lower and upper bound the graph. Since most mathematical functions run happily forever,
LinePlotlikes to understand where to start and stop - function: This block expects an X and Y value returned for a given value of
t
For given intervals of t of the plot within domain, it will call the function block. Inside of that, I call the spiral function on the SpiralCalculator to get the value for the next point. Since I wanted to share the spiral calculation logic to calculate the location of line caps, I put it in a separate function instead of inlining it.
Some modifiers were added to hide the chart backgrounds like the X and Y axis, and to keep it's container square no matter what so the spiral would be perfectly rounded.
One of the things I found hard to get my head wrapped around was the fact that this function is not marked @MainActor, but everything inside the View and ViewModel is on @MainActor. This generates a warning that will turn into an error in Swift 6 mode. I understand it's important to protect state in actors, but the spiral function is pure, so can be ran from any thread without any issue:
public struct SpiralCalculator {
    public func spiral(t: Double) -> (Double, Double) {
        let a: CGFloat = 0.1
        let b: CGFloat = 0.1
        let r = a + b * t
        let x = r * cos(t)
        let y = r * sin(t)

        return (x, y)
    }
}
The Circular Line Caps
To create the line caps as the original app had, I abused the already existing PointMark from Charts. It was actually meant to be just a data point on a graph, but I couldn't get custom line caps on the LinePlot and the PointMarks worked perfectly for what I needed.
I created an array of two points that I updated as soon as the user changes one of the sliders. Those two points I feed into the Chart and they will be rendered automatically in the right place.
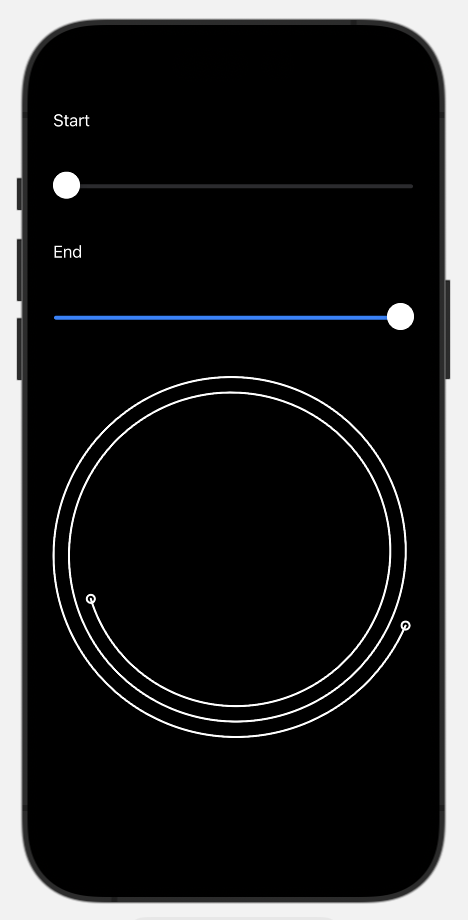
To be able to test it before adding touch support, I added some sliders to simulate the winding effect.
Working With the new @Previewable Modifier
Since I wanted to see what everything looked like without building out the whole app, including complex touch management, I wanted to have a few sliders so I could manipulate the begin and end points.
This was an excellent moment to test out the @Previewable modifier:
#Preview {
    @Previewable @State var viewModel = WinderViewModel()

    VStack(alignment: .leading) {
        Text("Start").padding()
        Slider(value: $viewModel.beginAngle, in: viewModel.minimumAngle...viewModel.endAngle)
            .onChange(of: viewModel.beginAngle) { _, newValue in
                viewModel.updateBeginPoint(to: newValue)
            }
            .onChange(of: viewModel.endAngle) { _, newValue in
                viewModel.updateEndPoint(to: newValue)
            }
            .padding()

        Text("End").padding()
        Slider(
            value: $viewModel.endAngle,
            in: viewModel.beginAngle...viewModel.maximumAngle
        )
        .onChange(of: viewModel.endAngle) { _, newValue in
            viewModel.updateEndPoint(to: newValue)
        }
        .padding()

        GeometryReader { geometry in
            Winder(
                width: geometry.size.width,
                viewModel: viewModel
            )
        }
    }.background(.gray)
}
This works absolutely great and exactly you expect. I used the WinderViewModel to manage the location of the begin and endpoints and the positions of the end caps.
Together with @Observable the Developer Experience was amazing, even in this early beta version of Xcode 16 that definitely still had some rough edges here and there.
The Result
It's fairly performant, but if I keep moving a slider continously it will take about 25% of one core's performance on an M2 MacBook Pro. So while this is perfectly fine, since it's coming from direct user interaction, it's definitely slower than my UIKit implementation that barely put a dent in the iPad 2 and iPhone 4S I was using for testing back then. I would not recommend to use this for continuous animations. I will try to compare build, launch and CPU / GPU perforance against the old version when the application is fully done.
The simplicitly of it all is absolutely great. It took me a few pages of Objective-C to do the same, while my SwiftUI code is so short I can easily share all code verbatim in this blog post. The only gripe I have it's not so easy to share the plotting formula, given the fact that the Actor model does not actually check for member access, but just blanket covers all of the functions, even the ones that are pure.
It already starts to look like Ovo Timer again:
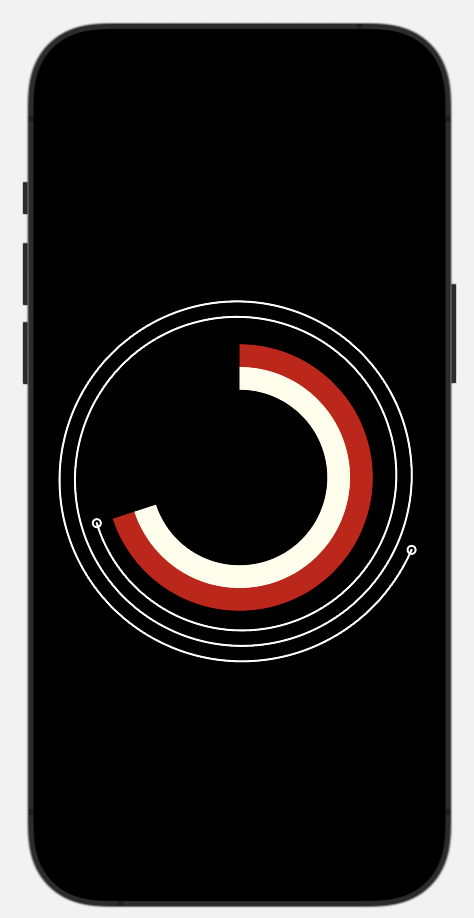
It definitely encouraged me to keep porting the rest of the application to SwiftUI, so stay tuned for Part 2, where I create the Model Package that will form the foundation of my new application, using a Test Driven approach.